Month: June 2021
9 Tips to Generate More Revenue From Your Amazon Business

Whether you’re a newbie or a veteran Amazon seller, it’s easy to get caught up in trivial matters and overlook important tasks that don’t seem urgent. But this is a mistake — just because something doesn’t seem urgent doesn’t mean it’s not important. Many of the things you might be overlooking are critical drivers for business growth and impact your Amazon revenue.
We’ve seen successful Amazon sellers take a few key steps, from delegation and outsourcing to collecting UGC and doing in-depth product research. We’ve combined those observations to form nine tips to grow your Amazon revenue.
9 Ways to increase Amazon revenue

1) Delegate what you can
Business owners have a tendency to wear many hats and feel obliged to work on everything. But remember, you are not a machine. Sometimes, it will serve you best to delegate some tasks to other people so you can focus more on your priorities.
Stretching yourself too thin means you don’t focus on what’s truly important in the business, such as generating multiple revenue streams, building your brand, or acquiring and retaining customers.
As you scale your operations, you need to enlist skilled help on different facets of your business like marketing, customer support, and accounting. While it’s not advisable to let go entirely, it’s better if you only oversee things rather than do the heavy lifting yourself.
How to get started:
- Make a list of the things that take up the most time.
- Separate out the items that are low priority and don’t contribute directly to building your brand or bottom line.
- Look at eCommerce services and contractors who can handle those items, and reach out for pricing.
2) Optimize your logistics
A business owner should proactively find ways to streamline their logistics. Some of the common pain points we’ve heard from customers who came to MyFBAPrep for help include slow shipments because suppliers were across the country from their warehouses, running out of warehouse space and manpower during high sales periods, and fulfillment being slow and expensive.
Improving your logistics can do two things for your bottom line: improve your business efficiency so you save more money, and delight your customers and convert more sales.
Working with a nationwide logistics network can help simplify operations through a wide range of services, transparent pricing, and distributed warehouses so you can always accept, prep, and store inventory close to its destination.
Read: What to look for in a third-party logistics provider
How to get started:
- Look at the processes that take up your time. This could be logistics and fulfillment, product research, repricing your goods, or optimizing listings.
- Figure out what you can delegate or outsource (see point above).
- Determine which processes are repetitive or unnecessary and cut them.
- Examine how you can combine processes to make things more efficient. For example, you may be able to ask your supplier to send inventory directly to your FBA prep center to get items ready for Amazon.
3) Invest in good SEO
Amazon SEO is different from general SEO. Amazon weighs conversions more heavily than things like bounce rate and inbound links.
To appear more frequently in searches, you need to optimize your listings and put in place strong SEO measures. You’re more likely to be discovered if you do keyword research, plug those keywords into your listings, and optimize based on what Amazon’s A10 algorithm looks at.
How to get started:
- Learn more about the Amazon A10 algorithm and what factors count toward your rankings.
- Evaluate your listings and update them where needed based on what A10 looks at, or delegate someone to do this.
4) Use high-quality photos
Buying online is risky because people can’t see and feel your product. To help you sell more, display excellent product photos that accurately depict the size, color, and texture of your products.
You should include at least eight pictures for variety, shot at different angles. Include close-ups and photos with someone holding the product for scale. Also, consider 360-degree images and videos to make your listing more engaging.
How to get started:
- Go through your photos and make a list of which need to be updated due to low quality, outdated info (like old brand packaging), or other issues.
- Look for a good photographer you can hire to capture product photos, or take them yourself following product photography best practices.
5) Write compelling descriptions
Sometimes, photos are not enough. Shoppers who want more detail will turn to your product descriptions to inform them.
Tell your brand story, highlight your best features, and offer instructions on how to use the item. Tell your customers exactly what they’re getting and why they should buy it.
How to get started:
- Research what customers love the most about your products. Look at your reviews and the negative reviews of similar items.
- Highlight your product’s advantages over your competitors’, and include the favorite aspects of your buyers.
- Optionally, hire a copywriter to update your descriptions and add more flair.
6) Collect testimonials and display reviews
Social proof is a powerful online influence, where buyers cannot see the physical product and have to rely on outside reviews. In fact, 71% of shoppers are more likely to purchase based on social media referrals.
User-generated content like positive reviews and video testimonials contribute heavily to increased sales. When people struggle to make a decision, they tend to look around to see what others are saying. By collecting those reviews, you can capture a larger perspective and convince shoppers on the fence to hit that buy button.
How to get started:
- Read Amazon’s review policy and remind yourself what’s allowed (and what’s not) to avoid seller suspension.
- If you sell DTC, consider leveraging your email list. Send out an NPS survey and ask everyone who rates your company well to leave a review.
- Use a tool to manage your Amazon reviews and monitor for negative reviews.

- (Source: SellerLabs)
7) Know your competitors
If you’re having a hard time deciding which SKUs to add to your catalog, look to your competitors for guidance. Check out Amazon’s best sellers to get an idea of what items are popular at the moment.
Run any products you’re considering through software that shows their potential. Look at estimated monthly sales, competitor intel, and fee calculators.

How to get started:
- Download a tool like JungleScout or Helium10 to research the competition. Check out Helium10’s toolkit for an overview of what you can leverage.
- Use free tools like Amazon ASIN to check on ASINs at a glance.
- Look at competitors with similar products to check their prices, images, what they highlight in their descriptions and titles, and what their reviews say.
8) Bundle relevant items
With so many vendors trying to sell products similar to yours, it can be challenging to capture your customers’ attention. To grab their focus, consider bundling products to create an irresistible deal.
Craft a new bundled listing to offer something no other seller has, resulting in a unique listing that shows up when people search for the product.
Everyone who clicks on the listing buys from you and you alone, effectively ridding yourself of the competition. You can even charge more since you include a bonus.
How to get started:
- Look at which items are commonly purchased together in your catalog and offer them as a bundle with extra savings.
- If you don’t have items relevant to one of your best sellers or high potential items, look at your competitors and start sourcing to expand your catalog.
- Work with a prep center that can handle bundling products so you don’t have to worry about creating bundles yourself.
9) Continue to test and grow

eCommerce is constantly changing, whether it’s consumer tastes, product improvements, or new marketplace rules.
You need to improve your business constantly if you don’t want to fall behind. A/B test your marketing and ads, learn the latest trends, and level up your eCommerce skills as often as possible.
More importantly, give your team the opportunity to learn, too. Your team should always improve their skills and learn about better ways to carry out their responsibilities. Their improvements will boost the company as a whole. A company that learns together, succeeds together.
How to get started:
- Sign up for our newsletter to stay on top of the latest trends in eCommerce logistics.
- Subscribe to eCommerce blogs and podcasts to learn continuously about the industry.
- Attend summits, trade shows, and other industry events to see what other sellers are doing.
Wrapping up – Increase your Amazon revenue with the 9 tactics above
Increasing your revenue on Amazon is necessary for growth on the platform. The more you sell, the more you can test bundles, collect user-generated content like reviews, and optimize your systems.
As long as you remain diligent with your listings and customer acquisition, you’ll begin to see an upward trend in your business.
Amazon 1P vs. 3P: Benefits of Each and Why to Move From 1P to 3P

For many brands and manufacturers, selling on Amazon is a no-brainer. However, there are different ways to sell. Choosing to handle everything 1P in single, seamless transactions with Amazon.com can be tempting. But, for many, delivering products directly to the consumer with 3P sales offers greater freedom, can be more profitable, and lays the groundwork for diversifying into other marketplaces.
Amazon 1P vs. 3P is therefore a question of logistics, infrastructure, and processes. Deciding between selling on Vendor Central (1P) or Seller Central (3P) depends on how involved you want to be, how you set up your logistics, and what infrastructure you establish.
What is 1P?
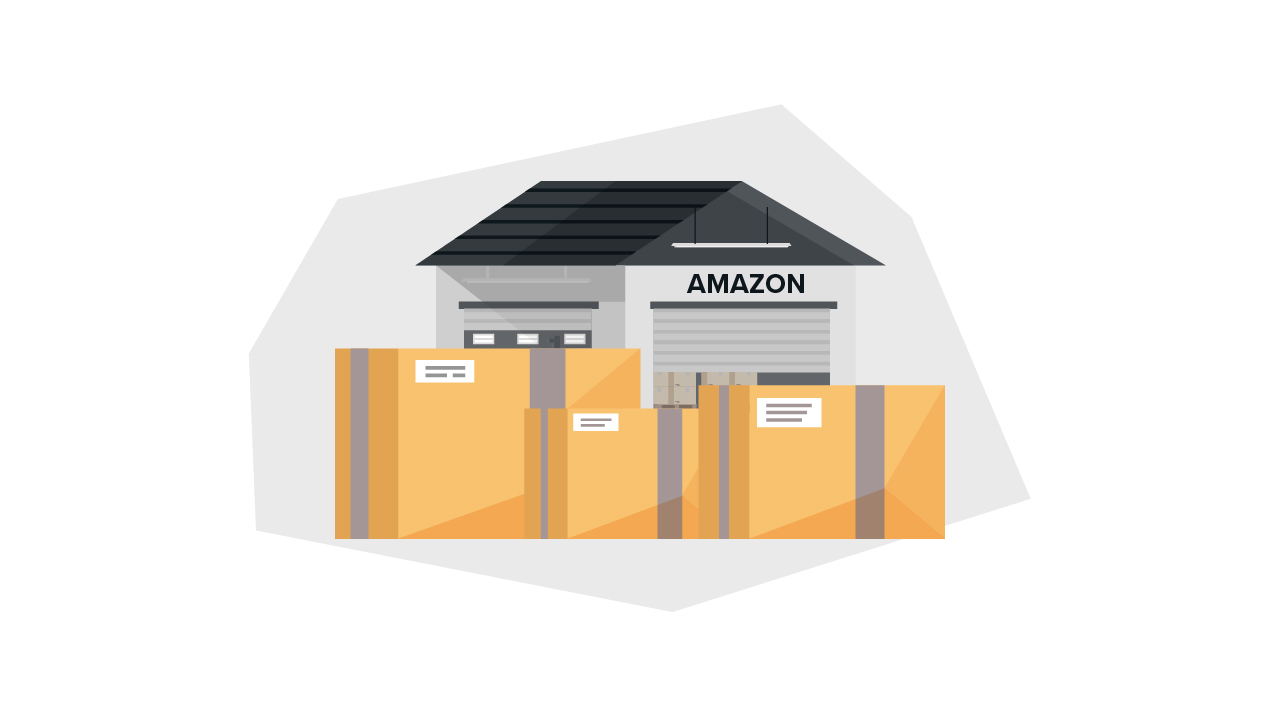
1P is often considered the easiest and fastest way to sell on marketplaces like Amazon or Walmart.com. It’s also the most traditional.
Rather than creating listings on Amazon, you sell directly to the company. Amazon negotiates a wholesale price for your goods, picks them up, and lists them for you. It then sets the pricing, controls the listings, and decides whether or not to make another purchase and when.
Benefits of selling 1P
1P has several surface benefits for manufacturers:
- It’s hands-off, meaning you don’t have to deal with logistics or distribution.
- You don’t have to handle direct-to-consumer marketing, sales, or customer service.
- You don’t have to worry about packaging, warehousing, etc., other than in your own existing system.
- Amazon handles marketing, promotion, and slotting.
- You can sell in bulk since marketplaces will purchase large orders.
Drawbacks of selling 1P
Unfortunately, selling 1P also means:
- Amazon buys at wholesale pricing, often at lower negotiated rates. You can expect a 20%–30% reduction over retail pricing at a minimum.
- Conditions are restrictive, and pricing on Amazon might limit your ability to sell on other marketplaces. For example, if Amazon is selling products cheaper than Walmart.com, you might not be able to sell on Walmart.com.
- You have no control over pricing, the listing, or photos on Amazon. For example, Amazon will negotiate a minimum advertised price (MAP) with you. But, they can still sell products for less than this if another reseller, authorized or not, uses a lower price because Amazon’s price-matching clause trumps the MAP clause. Once pricing is determined under MAP, it’s difficult to raise it.
- You have no control over logistics, so fast-moving products might frequently sell out without being reordered in a timely manner. This costs you considerable revenue because it means fewer products are sold.
- Amazon typically charges a 4%–10% fee to cover marketing costs, a 2% fee for freight allowance, and other costs. These can fluctuate, and Amazon will renegotiate over time, often at your expense.
1P works well for manufacturers that want nothing to do with direct-to-consumer sales. However, 3P is increasingly attractive to many, especially with outsourced fulfillment partners and Amazon’s own FBA service.
What is 3P?
3P selling is selling directly to the customer via the marketplace.
3P involves taking your goods to Seller Central and listing them directly for consumers to buy. While you can earn more, you also have to expand infrastructure to handle logistics. 3P marketplaces are extremely large, and today’s manufacturers often sell directly.
Brands like Anker, which sold almost exclusively on Amazon.com until 2017, are prime examples of this model’s success. And marketplaces like AliExpress are entirely built around manufacturers making direct-to-consumer sales.
Benefits of selling 3P
3P sales have much to offer manufacturers:
- Direct retail sales for a maximum profit per product, with no middleman.
- Freedom to expand to other channels, such as Walmart.com, without risk of being delisted due to pricing discrepancies.
- Full control over product presentation and branding, including which products are highlighted and marketed.
- More control over inventory and what stays in stock. You won’t miss sales because products are sold out.
Drawbacks of selling 3P
Conversely, 3P requires a significantly more hands-on approach, which is why many brands have avoided direct sales. Some of the challenges of 3P include:
- You’ll have to meet order demands, including packing, shipping, and fulfilling orders in a timely manner. This means adhering to marketplace requirements, providing a satisfactory customer experience, and gathering positive customer reviews on the platform.
- Prepping and shipping items can bring further costs. For example, seasonal sales are difficult to prepare for; meeting two-day shipping requirements across the globe requires extensive logistics. Additionally, Amazon FBA has strict packaging and inspection requirements you’ll have to follow.
- You’ll still have to pay Amazon fees. Amazon seller fees average 8%–20%, but are normally fixed per category. Charges will be predictable.
Essentially, moving to Seller Central from Vendor Central brings new costs and challenges. It’s important to consider both and assess how you intend to mitigate logistical issues, such as with Amazon FBA or another fulfillment-as-a-service solution.
Of course, FBA and third-party logistics (3PL) have their own associated fees, which you can calculate as part of your margins. For most, they’re cheaper and easier than building your own warehousing networks, delivery infrastructure, and packing plants – but that also depends on your volume of sales and existing network.
How does 1P compare to 3P?
Amazon 1P vs. 3P largely depends on your organization and how involved you’re willing to be. 3P sellers have to deal with considerably more in terms of logistics, customer service, and direct marketing. This can add complexity and require greater business investment, even if it results in larger profits in the long term.
Time vs. money
Selling 3P ups the time expenditure per sale, but also increases profit per sale. Conversely, 1P greatly reduces hassle, but can significantly cut into margins.
Even if you sell through a 3PL like Amazon FBA (which you probably should be), you’ll still have to invest significant resources into building infrastructure to prep and ready packages for FBA.
Tip: Sellers can use the nationwide MyFBAPrep network to handle all prep work, including bundling, kitting, labeling, and more.
Freedom to diversify
1P sellers may find themselves bound to a single marketplace, because you risk being delisted elsewhere if you’re selling for a lower price on Amazon (or another site).
Selling 3P means you control pricing and avoid being delisted (for example, if Amazon notices you’re selling the same product on Walmart at a cheaper price).
Diversifying across marketplaces offers greater business security, because if issues arise on one account or marketplace, you’re still secure in other sales channels. Furthermore, diversifying across different marketplaces across the globe offers even more opportunity for growth and security for your eCommerce brand.
Control over brand
If you sell directly to Amazon, you normally can provide product descriptions, marketing material, etc., up front. From there, it’s in Amazon’s hands. They’ll still charge you for merchandising, and you’ll have no control over product presentation, listing updates, or other alterations, even as your products change.
On the other hand, selling 3P means you have to handle all of this, which requires investing in merchandising, creating listings, and keeping everything up to date.
How to move from 1P to 3P on Amazon
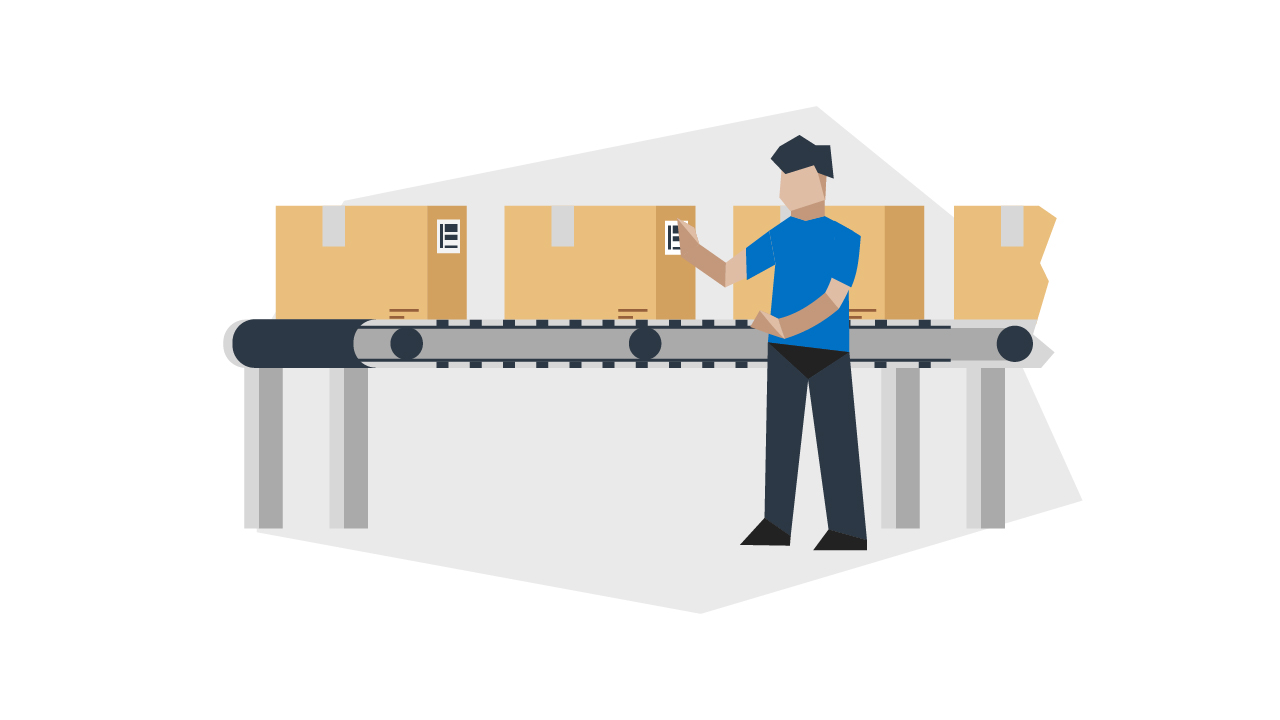
For many brands and manufacturers, 3P sales provide more profit, especially with the use of third-party logistics and prep solutions. Therefore, 3P Seller Central is the clear choice, if you can manage the infrastructure.
Set up listings
Plan listings and launch them. This should involve investing in high-quality merchandising (photos, descriptions, Amazon Vine reviews, etc.). The higher quality your listings, the more likely they are to make sales.
Invest in marketing
Performing Amazon keyword research, SEO, and creating a marketing budget for PPC will help to drive sales. This also helps you work around potential sales dips, in case Amazon stops featuring your products once they no longer sell them directly.
Use FBA
Fulfilled by Amazon (FBA) simplifies logistics, giving you access to worldwide distribution without the expense or complexity of building a distribution network. FBA is convenient, affordable, and delivers purchases on platforms like Walmart.com through multi-channel fulfilment. So, when you move to other marketplaces, you won’t necessarily have to choose another fulfilment partner right away (although you may want to).
Partner with a prep center
Partnering with an FBA prep center + FBA means packaging, labeling, inspection, pick and pack, etc., are all taken off your hands. You have the convenience of 1P sales without losing the profit margin to Amazon. It’s still important to assess total costs, but everything will be handled for you while protecting your margins.
Set up eCommerce management
While you can accomplish much of this through Amazon’s Seller Central, it’s important to have software and resources in place to:
- Track total inventory in your warehouse, in FBA, and in any other marketplaces.
- Implement fulfillment tactics like Just-in-Time, where you track sales and keep products in stock across marketplaces.
- Avoid overstock situations, especially at FBA, where poorly moving stock can eat into profit margins.
- Map peak sales periods and have inventory ready to meet demand.
Establish customer service
While customer service can be as simple as having someone on hand to answer inquiries, you’ll have to ramp it up as sales increase. Maintaining a direct relationship with customers means handling returns, dealing with questions, and resolving complaints in a timely and professional manner. Doing so will produce additional benefits, in that you’ll garner more positive reviews, and eventually make more sales.
3P sales introduce new complexity in terms of overhead, infrastructure, and logistics. While some of this, like listing setup, marketing, and long-term listing management, will likely remain your responsibility, most other aspects including prep, fulfilment, and even customer service can be outsourced, and more affordably than simply selling directly to Amazon.
If you’re ready to make the switch to selling 3P, get started with Fulfilled by Amazon by enrolling with MyFBAPrep. We handle every aspect of inspecting, preparing, and packaging your products for Amazon so distribution remains as simple as 1P wholesale.
How to Create an FBM Listing From Your FBA Listings
If you sell on Amazon, you probably use Fulfilled by Amazon (FBA). According to eDesk, 94% of Amazon sellers use FBA today, and we expect that number to increase as Amazon further builds out its networks.
It’s understandable — setting up with FBA is fast, easy, and means Amazon handles most of the infrastructure and logistics of fulfillment.
However, it’s not wise to put all your eggs in one basket. In 2020 and 2021, Amazon introduced strict new restock limitations (and this year, the surprises came less than a month before Prime Day).
Note: Restock limits replaced ASIN-level limits in FBA.
With the surge in online demand, the largest and historically reliable fulfillment network had to prioritize necessities. Even though the FBA network is continually growing, many sellers have asked us about FBM fulfillment as a supplement.
The extended time it takes for FBA to prepare items, along with new restock limits means sellers are looking for backups for their FBA operations.
Plus, for sellers not working with a reliable prep service, lengthy FBA prep times can further reduce the amount of stock they can keep at Amazon warehouses.
What to do if affected by Amazon’s new restock limits

There are a few ways to address these issues. One of the easiest is to remove all of your slow-moving stock from FBA. This will increase your throughput and speed up sales, ideally getting you higher restock limits. It can also free up space so you can send more best-selling items to FBA.
You should also create mirror FBM listings. Selling FBM is an easy way to back up FBA listings to ensure sales keep moving, even if your FBA inventory sells out.
Migrating FBA listings to FBM is straightforward, but there are a few ways to do it. Your reasons for adopting FBM will determine which is the ideal method for you, so let’s go through each option.
How to create FBM listings
1) Convert your FBA listings to FBM listings
Converting existing listings from FBA to FBM is relatively simple. The first and easiest method is ideal if you plan to remove your inventory from FBA entirely. This means you or your 3PL provider will handle operations, you have customer service set up, and you no longer need to use Amazon for logistics.
From Seller Central, go to Inventory > Manage FBA Inventory
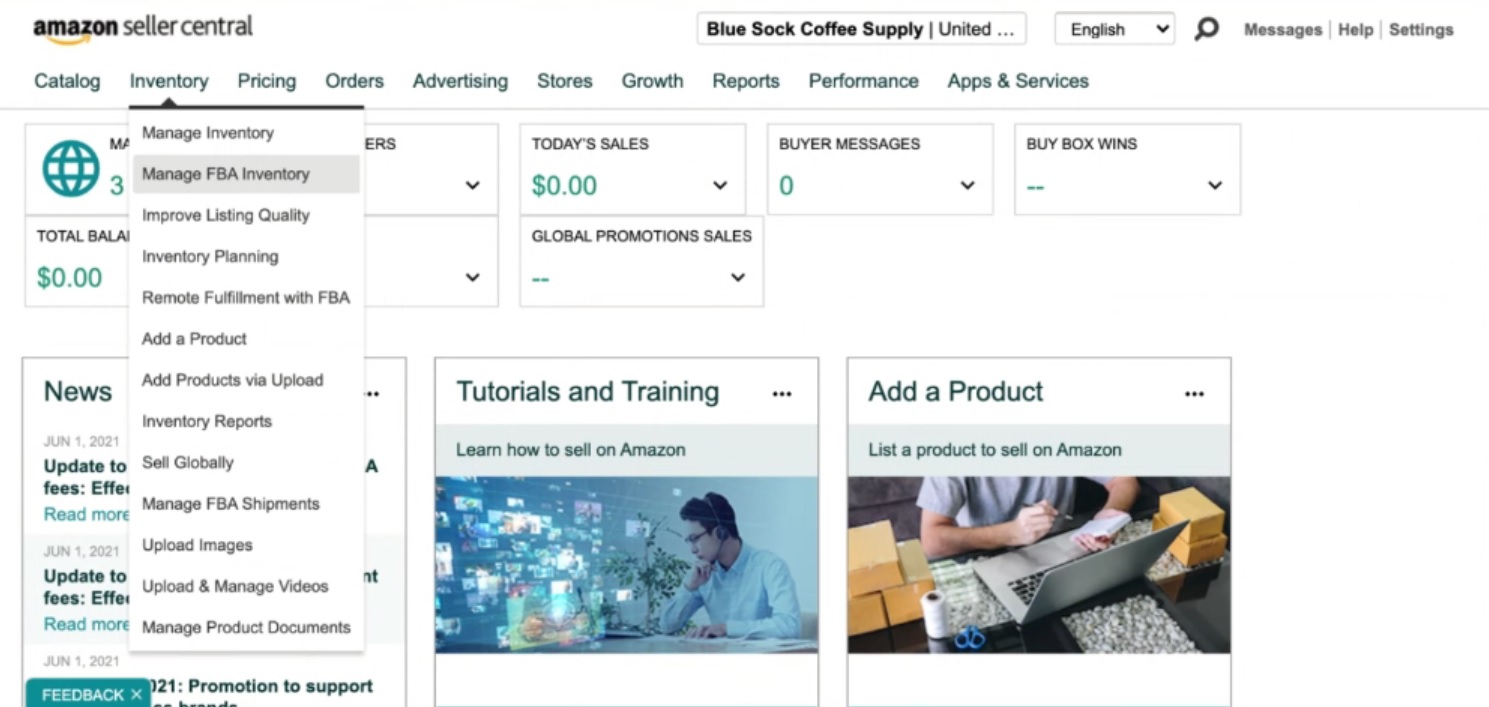
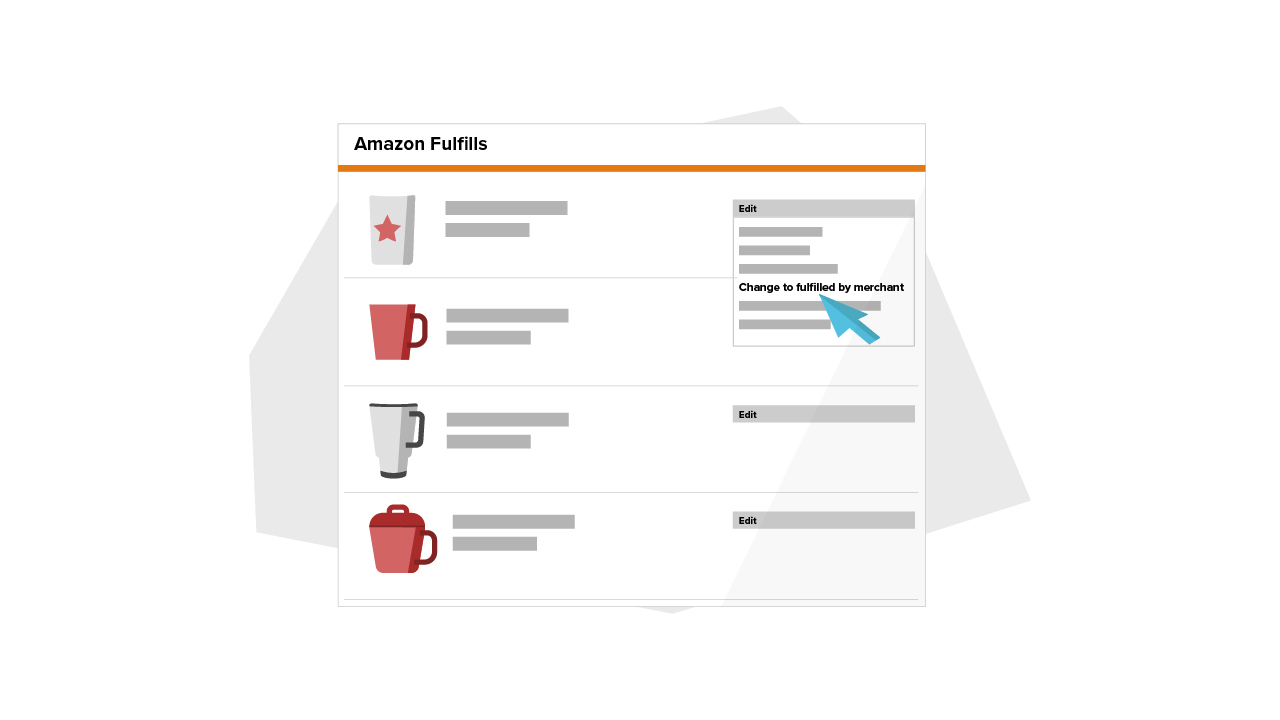
From there, you can multi-select the listings you’d like changed to FBM, then click on the dropdown arrow (circled in green below).


Select “Change to Fulfilled by Merchant” and wait for updates to process.
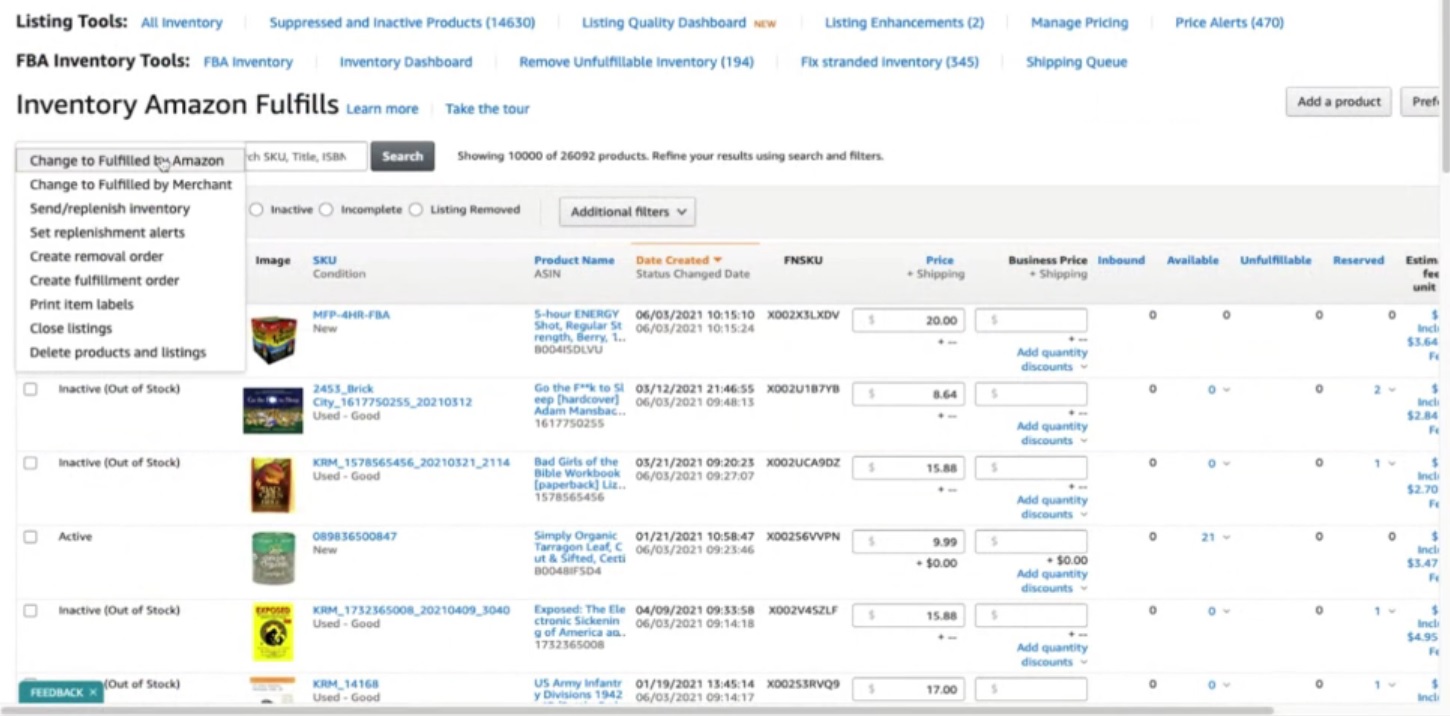

You can also convert a single listing (on the left side of your items) by clicking the dropdown and selecting “Change to Fulfilled by Merchant.”


Once you finish, you’ll handle fulfillment on your own. So, it’s a good idea to set up stock, change your shipping settings, and otherwise customize your fulfillment options. (We’ll cover that at the bottom of this article.)
2) Duplicate your FBA listings and turn them into FBM
While you’re not allowed to have two ASINs for the same product, you can have two products under the same ASIN. This means you can duplicate your FBA listing and sell it as FBM instead. Duplicating listings works well if you want to sell the product on FBA and FBM (for example, if you want to use your own stock to supplement FBA stock when your Amazon stock sells out).
Go to your FBA inventory following the steps above, and find the product you’d like to duplicate. Copy the ASIN.


Click on “Add a Product” on the right side of the screen.


Find your product on Amazon’s catalog using the ASIN you copied.


Select your product and choose the condition. Select “Sell this product” and “I want this to be separate” (from the existing listing).


Add a stock amount and make sure to select “I will ship this item myself” before you finish and save.
Your product will appear anywhere from a few seconds to 20 minutes after you click save. Once listed, your product will be available for sale on the original product page. You can view it by going to the page and clicking “Other Sellers and Formats.”
3) Create a new listing and make it FBM
In some cases, you may want to create a new listing on Amazon. This is a good option if you have negative feedback on the product related to past issues that no longer exist, or if the product was originally miscategorized.
Go to “Inventory” and then “Manage Inventory.”
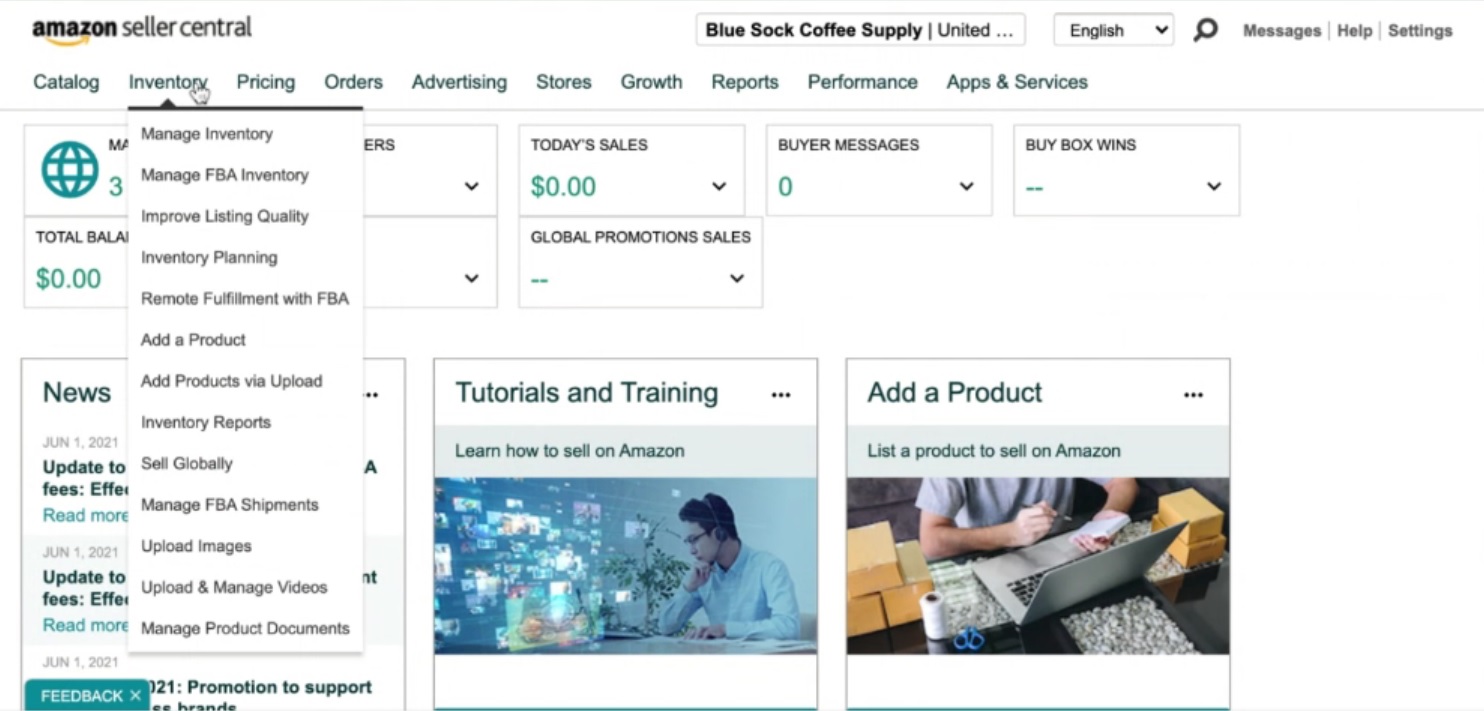

Delete the product. The ASIN will remain the same, but your listing will be removed. It’s important to take this step before creating a new product ASIN; Amazon does not allow you to have two products under different ASINs.


Create a new product by clicking “Add New Product.”


Add category information, product information, and an FBM-friendly SKU if you plan to set this listing up again with both FBM and FBA.


You can also copy the details from your existing listing. However, if you’re bothering to change the ASIN, it’s likely something is wrong with the original listing.
Finishing touches
Be sure to finalize your settings, review fulfillment options, and set delivery options when converting to FBM. This is important whether you intend to ship items with your own pick-and-pack team or with a 3PL.
Update shipping settings
Keep your settings up to date if you want to show up in search, meet customer expectations, and close sales.
For example, the default shipping time for FBM is 7-14 days. Most buyers don’t want to wait that long.
If you partner with a shipping provider, you’ll want to use the details you worked out with them. These include how long it takes to ship a product, and how much it costs you. Use the following instructions to input your specifications:
- Go to Settings
- Click “Shipping Settings”
- Click “Edit Template”
- Set regions you ship to
- Set Delivery Options
- Choose shipping costs
- Save
If you use a 3PL, contact them and connect them to your FBM inventory management. This ensures they see orders and fulfill them as quickly as possible.
Review listings
It’s important to run a final check of your FBA and FBM listings. If you no longer want to sell on FBA, either reduce inventory to zero or delete the listing. You can always add it back later by duplicating your FBM listing. You also want to ensure shipping times, stock details, and prices are correct.
To prevent competition between your FBM listing and the FBA listing, close the FBA listing. Alternatively, you can set your FBM listing to be slightly more expensive than the FBA one. Then, it won’t show until the FBA listing sells out. You’ll have a backup so you don’t sell out, and you’ll keep as many sales as possible with FBA.
Get your FBM fulfillment in place
It’s also important to ensure that you can fulfill orders from the moment you publish the new listing, because Amazon can immediately start sales.
Once you do, you’re responsible for shipping, customer service, and returns, all of which can be complex without the right infrastructure or a shipping partner.
Wrapping up – How to convert your FBA listings to FBM
Whether you’re switching to FBM for more freedom, to get around restock limitations, or to pull slow-moving stock out of FBA, it’s easy to convert listings. Simply choose the method that fits your circumstances, follow the instructions laid out above, and you’re ready to sell.
The Smartest Amazon Seller Podcast features MyFBAPrep Co-Founder Taylor Smits

Our very own Taylor Smits was featured on The Smartest Amazon Seller podcast in Episode 106: FBA Scales. Getting inventory into FBA doesn’t. Best solutions with Taylor Smits. Listen to the recording below.
MyFBAPrep started with an Amazon-seller focus, with a custom software built specifically for FBA prep. In addition to FBA services, MyFBAPrep also handles DTC fulfillment, subscription box fulfillment, bundling and kitting for different marketplaces, and other eCommerce services. The ability to handle all of these things with one location has helped multiple merchants streamline their businesses.
Getting products into Amazon isn’t always easy
There are countless ways to mess up your FBA prep process. There are two sides sellers need to tackle here — finding someone with Amazon FBA experience who understands how prep work needs to happen, and using the technology that keeps everything clean.
Our co-founder walks listeners through common pitfalls of FBA prep, how prep outsourcing will evolve in the future, and how to make the entire process easier for sellers.
How to Get Ready for Prime Day with FBM

Prime Day is coming fast, and for most Amazon sellers, it’s one of the biggest retail events of the year. This year’s estimates place Prime Day on June 21st and 22nd, less than a month away. For most sellers on a normal year, that means preparing by sending more inventory into their fulfillment networks — primarily, FBA.
Unfortunately, while Prime Day comes every year, recent changes at Amazon, particularly around restock limits, have left even veteran sellers confused. Amazon sellers in the subreddit r/FulfillmentByAmazon posted about “Massive cut in restock limits. Many sellers seeing a 20-50% reduction seeing overnight,” and a petition signed 1,300 times called on Amazon to “Not Suddenly Decrease FBA Storage Space.”
So, let’s talk about what’s happening with FBA, how to prepare for Prime Day this year (and subsequent years), and how to supplement FBA with FBM to back up your business and keep your sales moving.
What’s happening with FBA?
Amazon introduced restock limits in the early days of the pandemic in an attempt to make room in warehouses and account for increased demand.
Since then, those limits have consistently fluctuated as Amazon expanded warehousing and increased FBA capacity. With Prime Day approaching, Amazon has added new restock limits, which came into effect on April 22nd for most U.S. sellers. Additionally, restock limits at the storage-type level replaced ASIN limits.
These restock limits use past and forecasted sales to calculate utilization to sell-through ratio. This is essentially the ratio of stock sold between when an item is added to a shipment (not when it’s received by Amazon) and when it’s sold by Amazon.
To review this in your account:
- Log into Seller Central
- Go to the Inventory Performance Dashboard or Shipping Queue
- Click “restock limits by storage type”
Restock limits are distinct from storage limits, which simply define how much cubic space your ASIN can take up. Although restock limits apply regardless of IPI score, storage limits take IPI into account.
For example, if your IPI score was over 500 as of May, you may not have storage limits for Q3 2020 — although all bets are off these days. If it’s under, you should expect some storage limits.
In theory, restock limits allow sellers to maintain 2 months of stock with Amazon. However, calculations start from when items are added to shipments, not when they’re received by FBA. Additionally, they’re maintained based on forecast sales, which sellers are claiming aren’t always accurate, or properly calculating prospective Prime Day sales. Therefore, while sellers sent in record levels of stock for Prime Day, many find themselves now over the limit.
This is especially important considering:
- Stock added to FBA but not yet prepped or received by Amazon counts as part of your restock limit. You have to shorten times between adding to Amazon and receipt by Amazon as much as possible to maximize utilization.
- These are no longer ASIN limits, but total stock limits based on storage type.
- Even if Amazon allows higher restock limits for sellers participating in Prime Day sales, they don’t account for anyone expecting a natural uptick during the shopping event.
- Longer shipping times decrease your stock capacity, because it increases throughput time.
While these changes are intended to free up Amazon warehousing to allow everyone to send in inventory, they have hit many sellers hard. That’s especially true for organizations that normally purchase and allocate months of stock in advance, using Amazon for warehousing.
With many seeing 20-30% stock cuts overnight, sellers are scrambling to find warehousing and alternative solutions. Other sellers note that decreases in stock capacity mean they can no longer meet peaks, such as Prime Day without going out-of-stock.
Even more ominously, with the new algorithm in place, a stock out won’t just mean lost sales, incurred costs, and reduced search ranking in the Amazon algorithm – it’ll also mean an even further reduced restock limit (since sales were lower).
For many sellers, that could turn into a self-defeating cycle, where sales continue to drop because stock limits are just too low to meet demand.
What is the Amazon IPI Score?
The inventory performance index (IPI) is a metric used to measure your inventory performance over a period of time. The IPI score refletcts how productive and efficient you are in managing FBA inventory.
Amazon computes this every Monday based on your performance data over a 3 month duration. Scores above 450 IPI are considered good and mean sellers will pay fewer storage costs, and have more storage space. Amazon will also use this score to set storage limits as we mentioned above.
Protect your sales even during peaks (like Prime Day) with FBM
We’re advising all our customers to take steps to increase their restock limits. For example, sellers can issue removal orders for slow-selling products, cancel non-urgent shipments, and take steps to reduce the time from shipment to Amazon acceptance with FBA prep. However, that isn’t enough
Many sellers are now stuck with large quantities of stock they have to warehouse until it sells. While most are moving items back to their own warehouses or to third-party warehouses, that all creates risks and added expenses.
Fulfilled by Merchant (FBM) is an ideal solution for sellers who have found themselves with more inventory than they know what to do with (providing they can leverage a cost-effective fulfilment partner).
FBA sellers can easily sell via FBM alongside their existing listings by duplicating that listing and adding a new SKU. Tip: It’s always a good idea to add “FBM” to the SKU so it’s always clear which items are which.
In most cases, your best strategy should be to leave as much of your high-volume stock with FBA as possible, while keeping some in your FBM network ready to kick in as a backup.
Then, move low-volume or slower stock to FBM, which you can then sell yourself, without it cutting into your restock limits. That’s important, considering current restock limits are based on total throughput – your limits are designed to be two months of stock across all your products.
Here are some steps you can take now:
- Identify slow moving stock and recall it from FBA.
- Create FBM listings for all products that might sell out through FBA on Prime Day
- Connect with a 3PL to handle your excess inventory and FBM orders.
Tip: MyFBAPrep does FBA prep and can help you fulfill with FBM, which means you can send all of your excess inventory into our network, and replenish FBA as your restock limits free up.
Wrapping up – How to prepare for Prime Day with FBM
FBA is changing, and quickly. FBA storage space is in demand, and restock limits are leaving many sellers wondering what’s next. However, these changes don’t have to negatively affect your sales. Having an FBM alternative in place ensures uninterrupted selling no matter where FBA shifts.
Selling FBM is a backup plan that also allows you to keep slow moving stock out of costly Amazon warehouses, which could benefit you in more ways than one.
